Getting Started!! 🎬🎬
You may be wondering what practice projects you can do if you're a beginner at coding and just starting to learn HTML, CSS,and JavaScript. By doing these Projects, you will be able to build your portfolio and hone your skills in Html, CSS, and JavaScript.
Throughout this Blog, we will buidling up Four different Projects. Things learned in each Project will be used in the next Project that follows. Here's a quick breakdown of all the Projects:
- Project 1: We will build a Personal Blog using just Html.
- Project 2: We will build a custom Checkout Page for a Coffee Shop using Html and CSS.
- Project 3: We will build a IOS Calculator using Html, CSS, and JavaScript.
- Project 4: We will build a clone of "wordle" game - WordGuess. In this one, we will using async/await functions, API's along with Html, CSS, and JavaScript.
Before we start building Projects, here's a bit of an announcement. I have built these Projects and Source Code for them is in my GitHub Repository. It would be really nice if you could star this Repo. I have included my Twitter account as well. Since Elon Musk bought Twitter, I am kinda thrilled to post cool tweets every now and then.
Project 1: My Personal Blog 📔📔
- This Project is entirely based on using Html.
- You can check it out here.
In this Project, We will make a personal blog using just Html.
Some key notes:
Before you start, here are few Requirements to keep in mind for this Project!! However, feel free to customize to your wishes.
- Your blog has two pages: index.html and about.html
- Your index.html needs a title and a quick intro.
- Your index also needs a link to about.html.
- You blog must have five posts on it (you can just keep it all on the same page).
I tried to include around 5 Images that conclude to 5 Blog Posts. Each post needs:
- A title
- An author
- The date it was posted (feel free to make up times)
- The text of the blog post.Feel free to use Lorem Ipsum if you want placeholder text.
- An Image
Your about.html needs
- The name of your blog
- A few paragraphs about you
- A list of your recent jobs/schools/accomplishments
Here a Quick showdown of each of the Web Page:
- This one is "index.html"
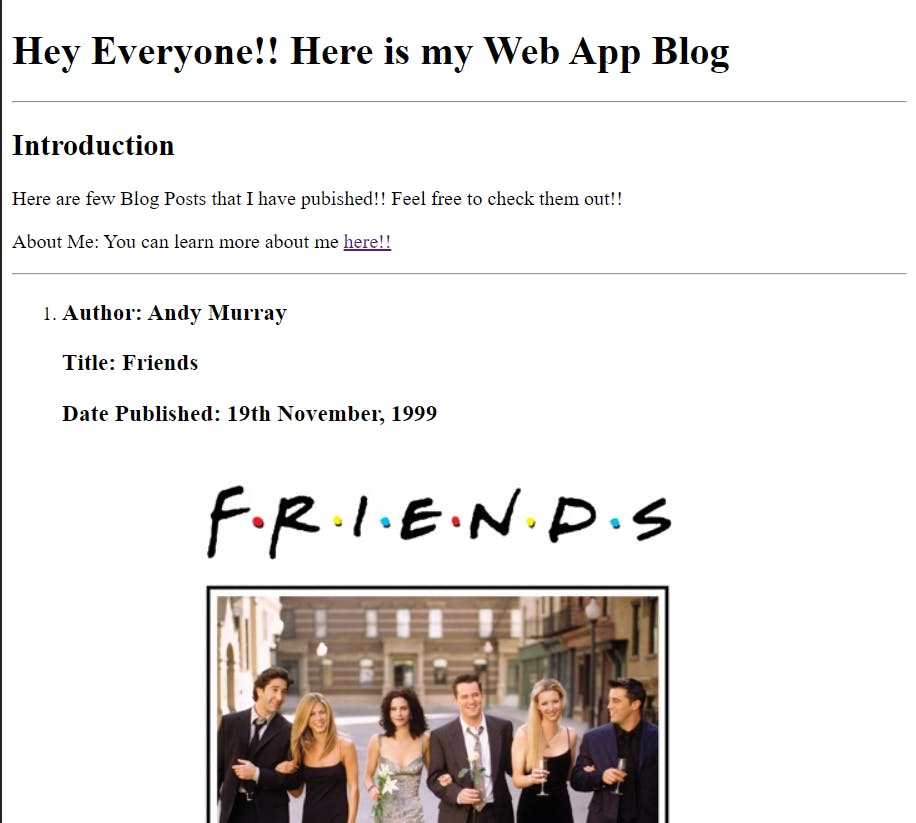
- This one is "about.html"
 IMP: Quick note on how to do an image: put the image in the same directory as the index.html and about.html and then put
 <img src="the-name-of-the-file.jpg" alt="a text description of what the image is for sight-impaired folks" />
Hamit's Work
Here is my example: You can check my Work here:
Project 2: Checkout Page for a Coffee Shop ☕☕
In this Project, We will make a custom checkout page for a Coffee Shop.
- It should look somewhat like this. However, feel free to customize it to your wishes.
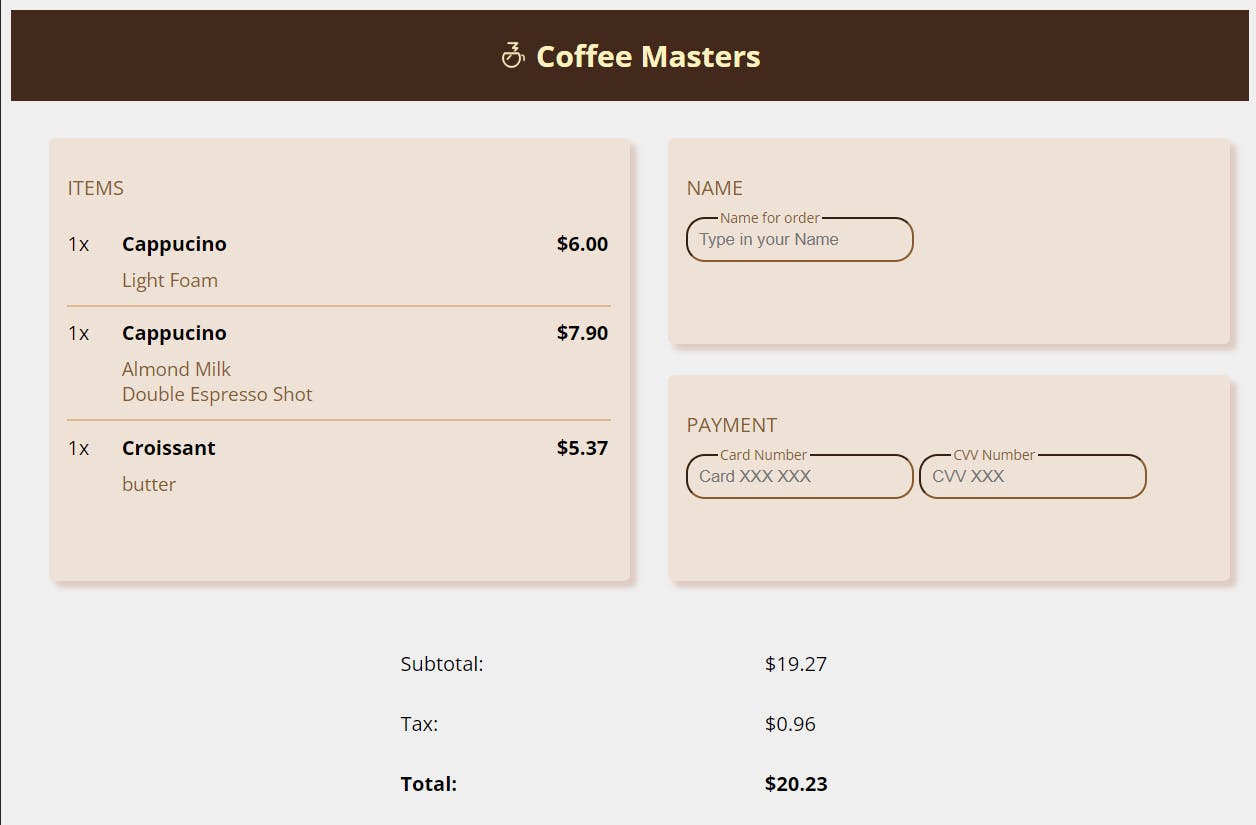
I got the logo for Coffee Masters from here:
Some key notes:
- Use border-radius to get rounded corners.
- There are many ways to do this Project. Flex and grid would work well, just don't go overboard with grid, it'd be hard to 100% handle this layout in just grid.
- HTML inputs can be styled with HTML just as you expect.
- You can give it the nice little shadow effect with the CSS property box-shadow.
- My Project Solution contains around 130 lines of Html code and approx. 200 lines of CSS. For this Project, I have strictly used only Html and Css.
- Again, you do not need to do it the way I did. There are infinite correct ways to do this.
- I ended up using grid for layout of entire WebPage.
Adding a web font
You can add a font using Google Web Fonts (lots of ways to do it, Google's is easy) by adding this tag in the
<link
  href="https://fonts.googleapis.com/css2?family=Open+Sans:wght@400;700&display=swap"
  rel="stylesheet"
/>
and by adding font-family: 'Open Sans', sans-serif; to whatever you want to change the font to be. You don't have to but it's pretty cool! [Check out Google Fonts][font] if you're curious.
Getting overlayed Input:
Here's a Quick Example on how to an Overlayed Input like this:

<div class="example-group">
  <label for="example" class="input-label">Example Text</label>
  <input id="example" class="example-input" placeholder="try typing here" />
</div>

<style>
  .example-group {
    position: relative;
    display: inline-block;
  }

  .example-input {
    border-color: crimson;
    padding: 8px;
    border-radius: 5px;
  }

  .input-label {
    background-color: white;
    color: crimson;
    font-size: 11px;
    position: absolute;
    left: 25px;
    top: -7px;
    padding: 0 2px;
  }
</style>
No HTML to display here
Hamit's Work
You can check my Work here:
Project 3: IOS Calculator 🖩🖩
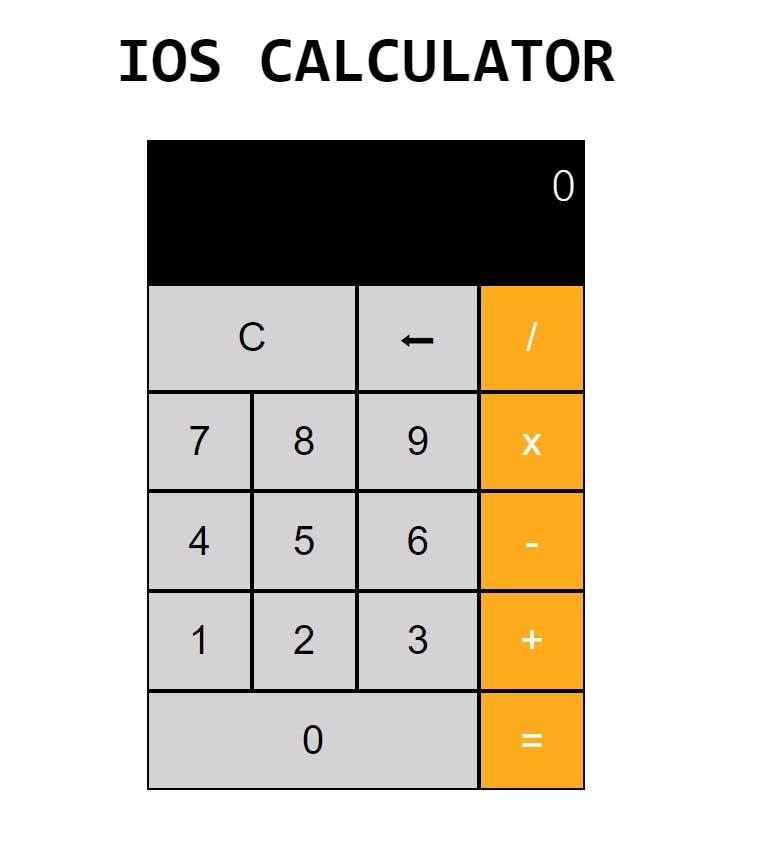
In this Project, I made a calculator on iOS! If you've never seen that before, here it is:
Some key notes:
- The calculator should look like the above image
- The calculator should function like a normal calculator
- Do not implement % or .. You can assume everything will be an integer.
- C means clear. When a user clicks it, it should clear everything and go back to the first state it was in when the page loaded.
- Doing the back arrow is extra credit. It's like pressing backspace; it'll delete the last character typed. If it's clicked when there's only one digit, it sets the current number to be 0.
- Don't worry about if the number is too long for the screen.
- Calculators tend to have some special behavior when you hit equals: if you type another number it erases the results and starts over.
This Project is a bit tough than what we did before. So, here are few tips and tricks for you.
HTML and CSS Tips and Hints
- Programming is all about taking large problems and breaking them into smaller problems. If you're trying to tackle too much at once, break it into two smaller problems and try to solve one of those.
- Personally, I wrote the HTML and CSS first. Once that's all taken care of, then I do the JavaScript.
- For the font of the "result screen" I'd just use monospace.
- There are so many ways to write this. There is no one right way. My solution is not the only nor is it the best solution. Experiment. Try. Fail. Succeed. It's all about learning here.
- Good idea to use for the buttons. You have to deal with some extra styling stuff but it will make your code work pretty much automatically for disabled people. In general when writing HTML, if something serves the function of a button, make it a .
- The secret to getting equal gutters (which is what you call the black space between buttons): you can set width to be 24.5% (so four of them fit on a line) and then use justify-cotent: space-between to evenly space them. That'll give them a gutter of roughly .5% of the whole width. The problem with using percentages in conjuections with heights: your heights and widths are different. 5% of height is not the same of 5% of width, and that'll make the gutters look weird. You want the bottom gutters to be the same size as the side gutters. margin-bottom to the rescue! If you give the row a margin-bottom of .5% (if you're using my same numbers) then that'll work since margin is always measured as a function of width (just one of those things you have to know!) Hopefully that helps.
- You can add a class to get the orange buttons. Or you could try :last-child (assuming you have row div.)
JavaScript Tips and Hints
- Again, no wrong way to do this. I wrote about 80 lines of JavaScript to finish the project (not including empty lines.) I say that so you have an idea of how much code you should be writing. If you're writing 200+ lines of code, you may want to rethink some of your solutions. Don't feel like you're going for the smallest possible answer. You're just going for correct.
- It is good to use console.log everywhere while writing code. Just remember to take them out at the end.
- Many small functions is very preferable to one large function. Have each function do one thing well as opposed to having giant functions that do everything. If you find a function doing too, break it into smaller pieces. I solved it with eight different functions.
- You'll need to keep track of several variables. Make sure these variables are stored in a place where they stay in scope.
- You can add an event listener to each button individually, or you can use one listener at the root of the button. I did the latter but it's up to you.
Hamit's Work
You can check my Work here:
- Here is my HTML
- Here is my CSS
- Here is my JavaScript
Project 4: Basic Wordle Clone - WordGuess 🎮🎮
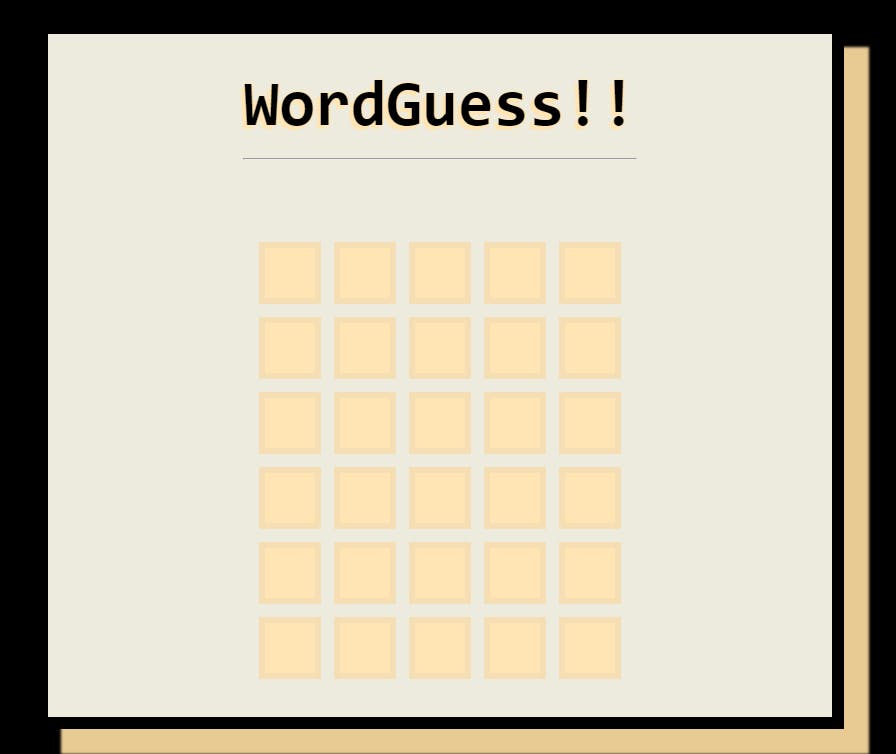
In this Project, We will build a very basic clone of "wordle" - WordGuess If you've never seen that before, here it is:
IMP:My Project doesn't work on mobile phones. If yours does, that's wonderful
Here's how you Play it - WordGuess:
- There is a secret five letter word chosen
- Players have six guesses to figure out the secret word. After six guesses, they lose
- If the player guesses a letter that is in the right place, it is shown as green
- If the player guesses a letter that is in the word but not in the right place, it is shown as yellow
- It does account for however many of the letter exist in the word. For example, if the player guesses "SPOOL" and the word is "OVERT", one "O" is shown as yellow and the second one is not.
- If the player guesses the right word, the player wins and the game is over.
API's
You have two APIs to work with. These are Configured and Maintained by Frontend Masters.
GET words.dev-apis.com/word-of-the-day
- This will give you the word of the day. It changes every night at midnight
- The response will look like this: {"word":"humph","puzzleNumber":3} where the word is the current word of the day and the puzzleNumber is which puzzle of the day it is
- If you add random=1 to the end of your URL (words.dev-apis.com/wordof-the-day/get-word-..) then it will give you a random word of the day, not just the same daily one.
- If you add puzzle= to the end of your URL (words.dev-apis.com/wordof-the-day/get-word-..) then it will give you the same word every time.
POST words.dev-apis.com/validate-word
- You must POST to this endpoint, not GET.
- The endpoint expects JSON with a property called "word". A valid post body would be { "word": "crane" }.
- The API will return back to you the word you sent and validWord which will be true or false. e.g. { "word": "crane", "validWord": true } or { "word": "asdfg", "validWord": false }.
- This endpoint only validates five letter words.
- This endpoint only validates English words and will not validate any accents or non-letter characters
- Do this part last. It's the hardest part to get right.
Tips and Tricks!!
Use this function to test is a string is a single alphabetical string is a letter Use this function to determine if a user hit a keystroke that is a valid keystroke. Ignore it if it's not.
function isLetter(letter) {
  return /^[a-zA-Z]$/.test(letter);
}
<input type="text" class="tester-input" placeholder="only letters allowed here" />
document
  .querySelector(".tester-input")
  .addEventListener("keydown", function (event) {
  // uses the isLetter function from above
  if (!isLetter(event.key)) {
    event.preventDefault();
  }
});
How to start this Project..?
I suggest you try to get started yourself. It's good for you to conceptualize a whole problem and then work on it yourself so you arrive at the whole solution yourself.
Still need help though? Here's how I broke down the project
Steps:
1. Write the HTML. Get all the divs and such that you'll need. Make sure to link a stylesheet and a script to run your CSS and JS
2. Style it. Write the CSS to get to the state where everything looks right.
3. Starting on the JS, get the core mechanic of typing down. You'll have to handle
    a. Handle a keystroke with a letter.
    b. Handle a wrong keystroke (like a number or spacebar). Ignore it.
    c. Handle "Enter" when the word is complete (go to the next line)
    d. Handle "Enter" when the word is incomplete (ignore it)
    e. Handle "Backspace" when there's a letter to delete
    f. Handle "Backspace" when there's no letter to delete
4. Handle the API request to get the word of the day
5. Handle checking just if the word submitted after a user hits enter is the word is the word of the day
6. Handle the "win" condition (I'd just start with alert('you win')))
7. Handle the "lose" condition (I'd just start with alert('you lose, the word was ' + word)))
8. Handle the guess's correct letter in the correct space (the green squares)
9. Handle the guess's wrong letters outright (the gray squares)
10. Handle the yellow squares
    - Handle the correct letters, wrong space (the yellow squares) naïvely. If a word contains the letter at all but it's in the wrong square, just mark it yellow.
    - Handle the yellow squares correctly. For example, if the player guesses "SPOOL" and the word is "OVERT", one "O" is shown as yellow and the second one is not. Green squares count too.
11. Add some indication that a user needs to wait for you waiting on the API, some sort of loading spinner.
12. Add the second API call to make sure a user is requesting an actual word.
13. Add some visual indication that the user guessed something isn't an actual word (I have the div elements flash red on the current line)
14. Add some fun animation for a user winning
Hamit's Work
You can check my Work here:
- Here is my HTML (you'll need to view source)
- Here is my CSS
- Here is my JavaScript
Acknowledgements
I designed these Projects while learning Web Development from Frontend Masters. Huge shoutout to Brian Holt and Frontend Masters for creating this awesome course.
- Here is the link to this Course Website!!
- You can take this Course for free on Frontend Masters. Here is the Link!
- Project Idea - Frontend Masters
- Awesome README Builder - readme.io
